Are you stuck in a sea of endless approvals and missed deadlines? Say goodbye to inefficiencies and hello to automation! Power Automate is here to simplify your workflow and make those messy approval chains a thing of the past.
Creating an approval flow in Power Automate is a hidden advantage for streamlining your business processes—whether you’re managing project sign-offs, handling PTO requests, or sealing the deal on invoices. This guide will walk you through everything you need to know to take charge of your approvals easily.
What You’ll Learn
- The basics of approval flows and why they’re essential.
- A step-by-step guide to building one in Power Automate.
- Best practices, expert tips, and troubleshooting advice to keep you running smoothly.
It’s time to save hours, reduce errors, and boost team collaboration. Let’s get started, shall we?
Understanding Approval Flows
What Are Approval Flows?
An approval flow is an automated process that ensures specific tasks or decisions receive proper validation from designated individuals before progressing. It is a structured and adaptable workflow in which stakeholders approve or deny a particular step.
Key features include:
- Automating repetitive approval requests.
- Setting deadlines to avoid delays.
- Sending instant notifications to approvers for quick action.
Real-World Use Cases
Approval flows aren’t reserved for IT wizards or corporate giants. Businesses of all sizes can use these for:
- Invoice Processing: Automate approval for payments after invoices are submitted.
- Time-Off Requests: Streamline how employees request and get approval for PTO.
- Project Sign-Offs: Gather stakeholder approval on key deliverables seamlessly.
- Content Approvals: Ensure blog posts or marketing materials go live only with permission.

Why Are They Game-Changing?
Approval flows supercharge productivity by replacing manual, error-prone processes with smooth automation. No more tracking approvals through vague email trails—Power Automate keeps it all tidy, visible, and automatic.
Step-by-Step Guide to Creating an Approval Flow
1. Log in to Power Automate
Start by heading to the Power Automate portal (powerautomate.microsoft.com). Use your Microsoft account to log in and access its features.
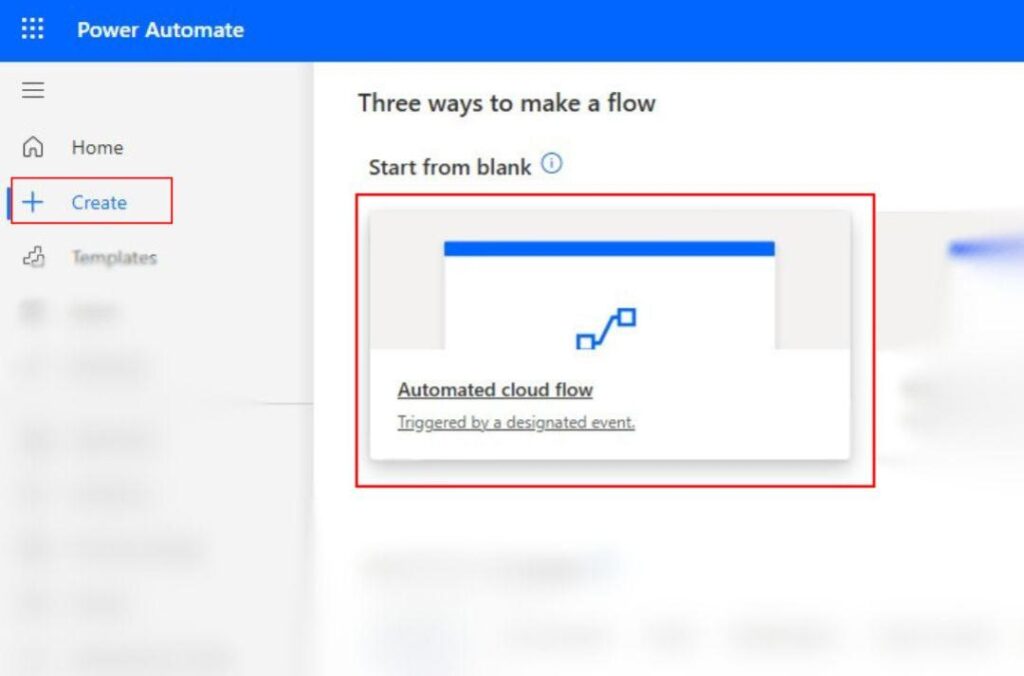
2. Create a New Flow
Decide which type of flow you need for your approval process.
- Automated Cloud Flow: For processes triggered by events (e.g., a document upload). This is the method we will use in this how to guide.
- Instant Cloud Flow: Manually triggered flows for on-demand approvals.
- Recurrence Flow: The automation runs on a schedule, from every second to every month, on a timeline that you choose.
3. Define the Trigger
Triggers set your automation in motion. Like the DJ at a party shouting, ‘Hit it!’ The moment they hear their cue, the automation dance floor lights up, and your workflows start grooving.
Examples of triggers include:
- A new form submission via Microsoft Forms.
- An item added to a SharePoint list.
- A new email landing in your inbox.

4. Add an Approval Step
Power Automate makes this super easy. Add a step by using the plus below the initial trigger box and choose ID Response.
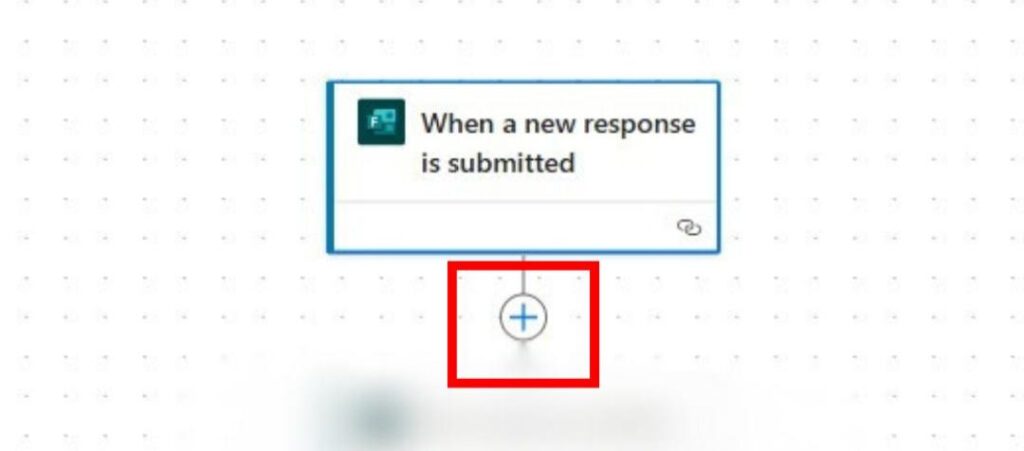
Select the “Start and Wait for an Approval” action. Here’s where you can:
- Define approvers (individuals or groups).
- Customize messages for clarity.
- Add time limits to avoid bottlenecks.
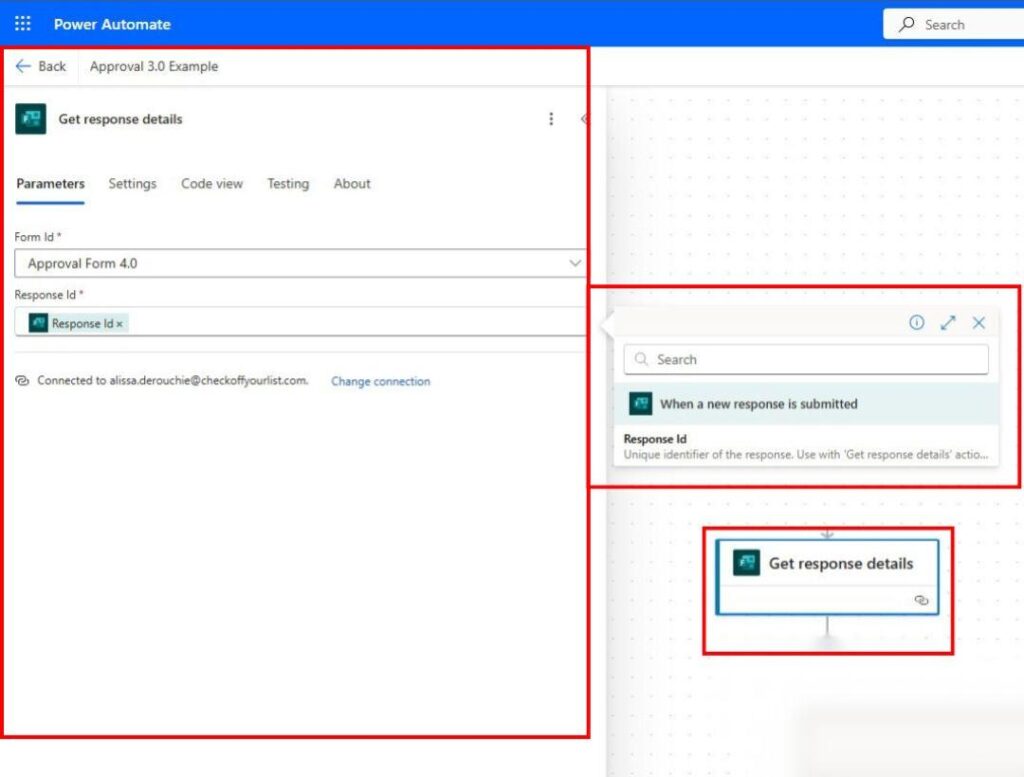
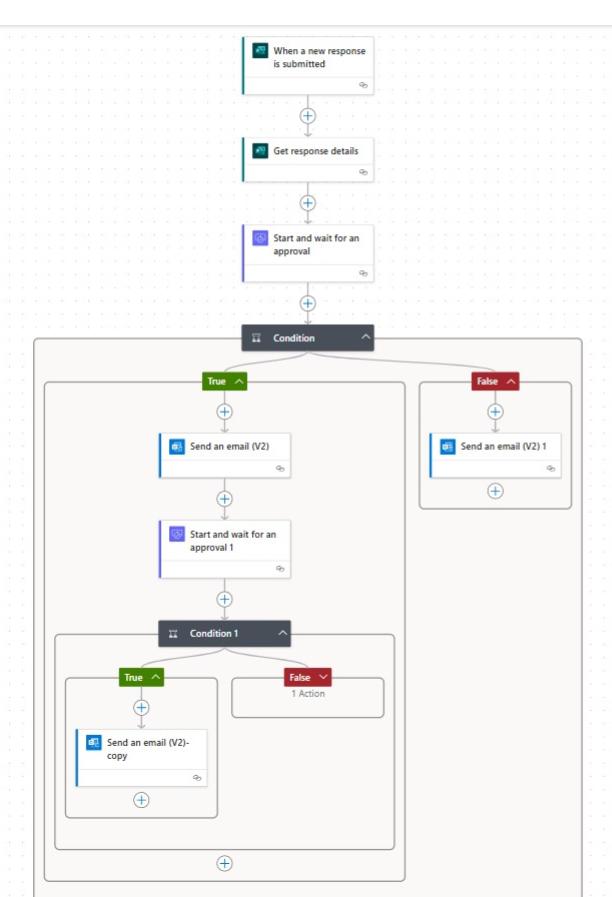
Add another step and choose “Start and Wait for an approval”. Here you can set response item 1 and 2. Because who doesn’t love waiting for approvals? It’s like the suspenseful cliffhanger of the workflow world.
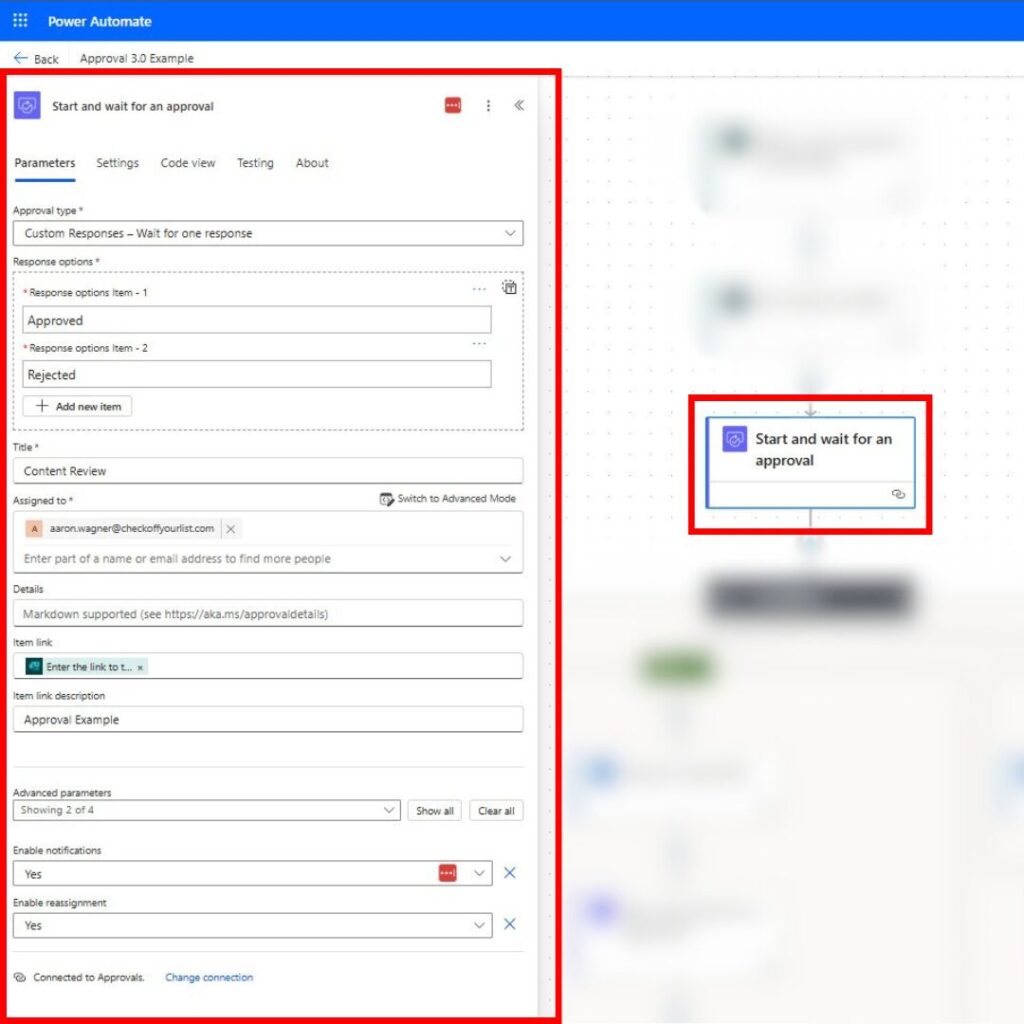
5. Set Conditional Branches
“Conditional Branches in Power Automate are like a GPS for your workflow — they hit a fork in the road and ask, ‘If we go left, tacos; if we go right, pizza?‘ Either way, they’ll get your automation exactly where it needs to go, just with a little decision-making flair.”
In this case, what happens if the approval is:
- Approved? The flow continues to the following action (e.g., send confirmation to the initiator).
- Denied? Forward it back for revisions or notify relevant teams.
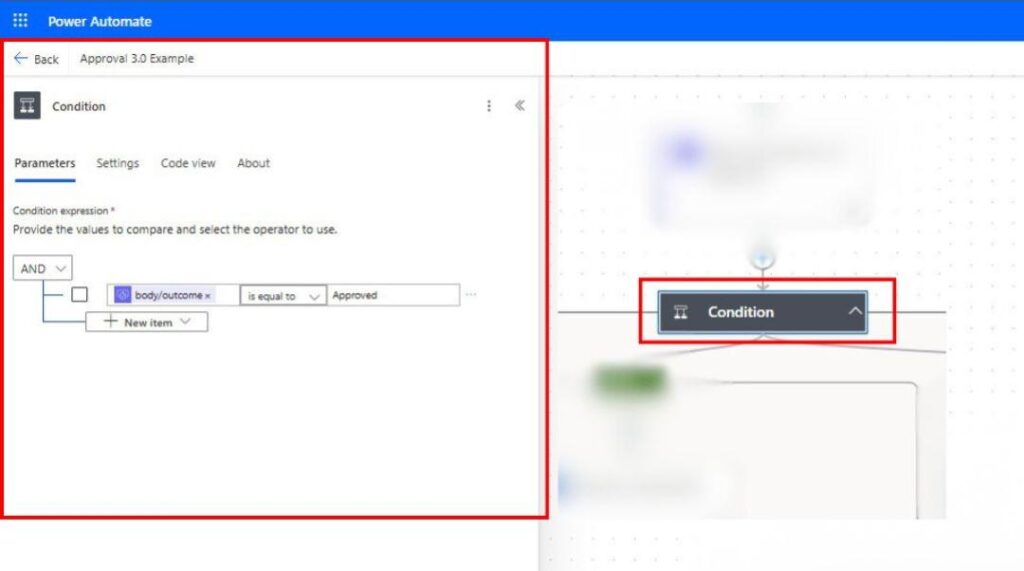
Automating Email Responses with Power Automate
Automating email responses can help ensure timely replies and improve communication efficiency. With Power Automate, you can set up an automated email flow using conditional logic to determine when and how responses are sent.
Using True and False Functions
Power Automate leverages true and false functions to create conditional rules for your email workflows. For example, these functions can check if certain conditions are met, such as:
- Whether the email is from a specific sender
- Whether the email contains certain keywords
If the condition is evaluated as true, the automated response is triggered. If it is evaluated as false, the flow can either stop or follow an alternative action. This ensures email responses are only sent when appropriate, helping you maintain clear and relevant communication.
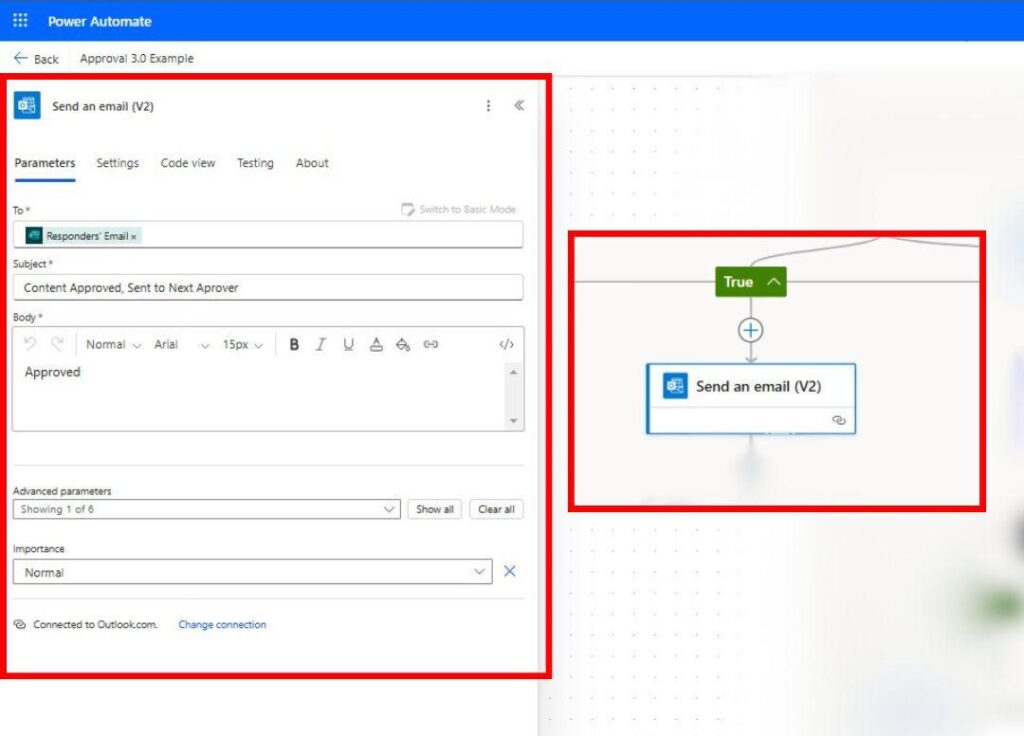
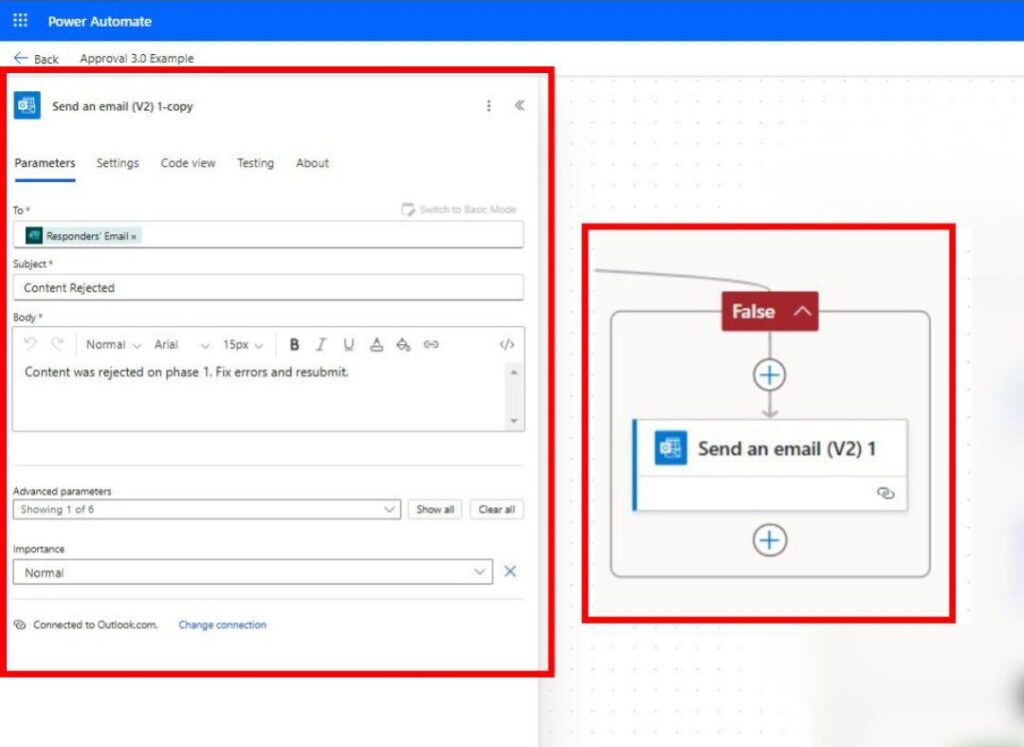
If an additional email approval response is needed this can be done by using the same condition method as done earlier to ensure all necessary stakeholders can review and approve the process seamlessly.
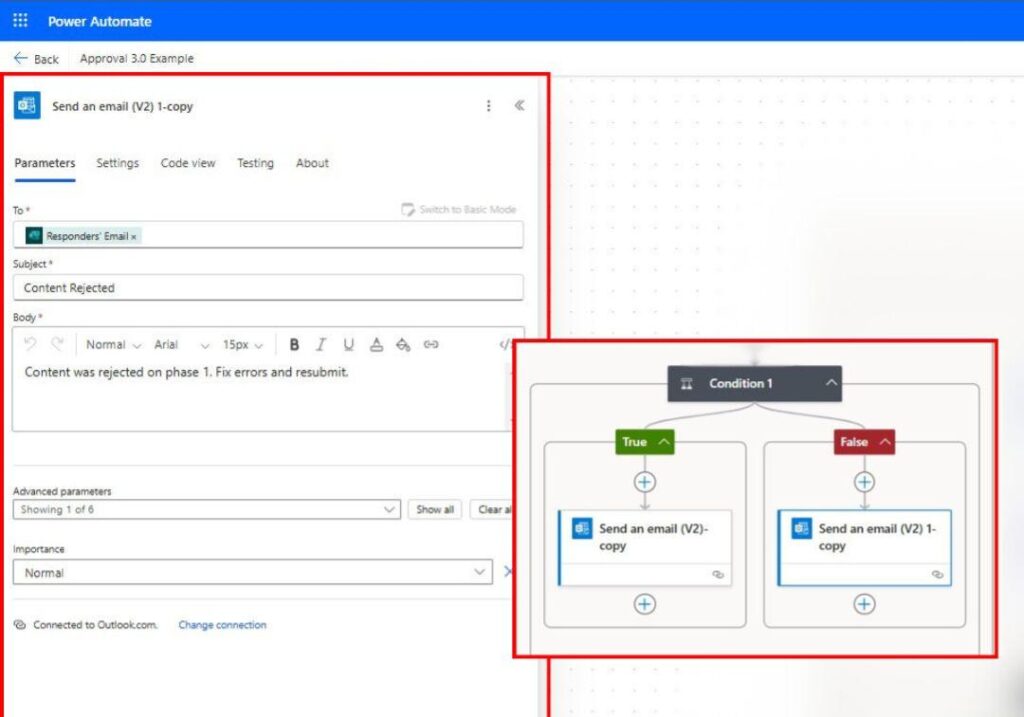
Once everything is in place, the complete workflow should resemble this:
6. Test Your Flow
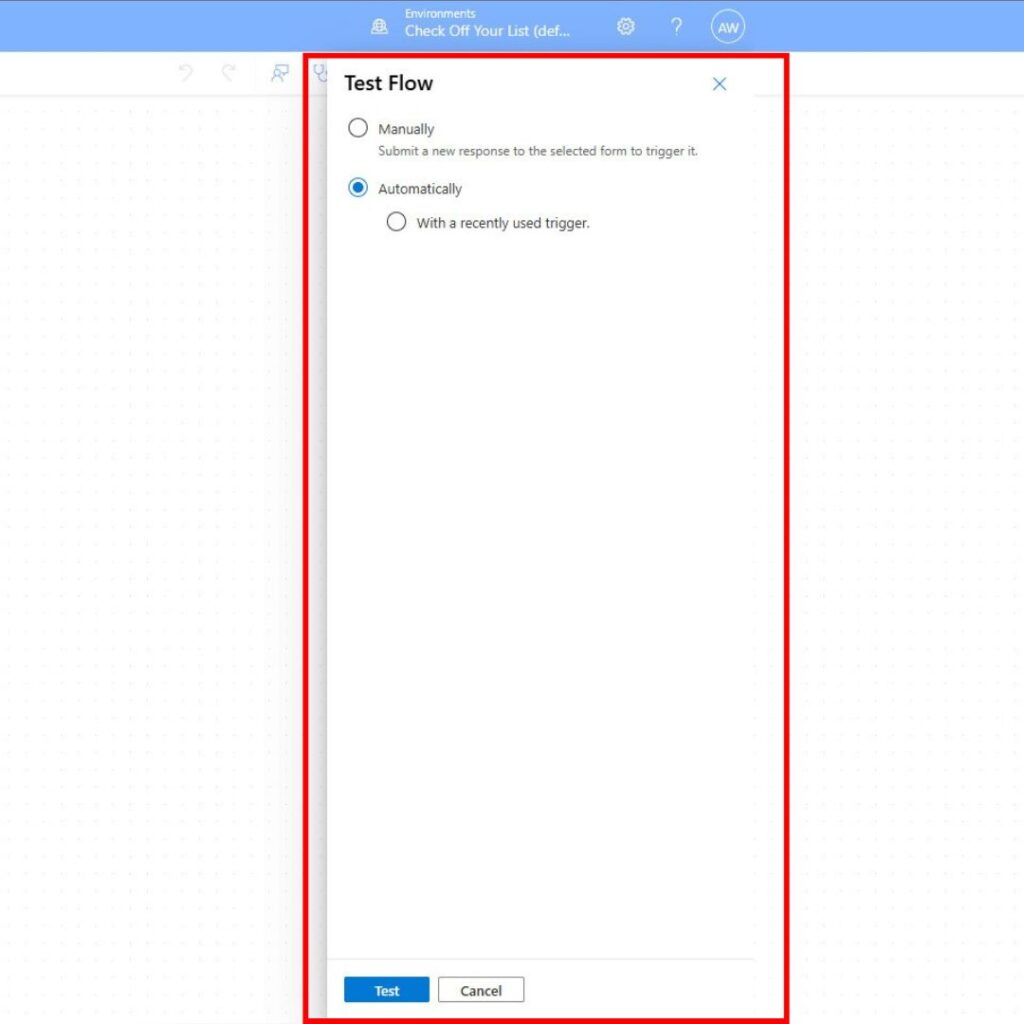
Hit the test button to simulate your flow and confirm it’s working as expected. Nobody likes debugging while on a deadline!
7. Launch Your Flow and Keep Automating!
Turn on your flow and watch as the gears of productivity start spinning without a hitch.
Troubleshooting Common Issues
Even the best tools have their off days, and Power Automate is no different. Flows fail, connections break, and configurations throw tantrums—it’s like your workflows decided to have a bad hair day. But fear not! Here are some checkpoints to tackling the most common Power Automate problems so you can get back to smooth automation without losing your cool (or your flow).
Problem 1: The Flow Won’t Trigger
Check your trigger configurations. Ensure all linked tools (Outlook, SharePoint, etc.) have proper permissions.
Problem 2: Approval Actions Not Responding
Approver emails might be marked as spam. Ask your recipients to whitelist Power Automate emails.
Problem 3: Condition Errors
Verify your conditional actions and responses are set correctly. Not setting both response options can result in disruption of approval.
Need Help?
Our support team specializes in resolving Power Automate challenges for small businesses just like yours. Book a free consultation with our automation specialists! Together, we’ll streamline your workflows and bring efficiency to the next level.


